Tuesday, November 24, 2009

Dabbling with Densities


There are two factors that you want to keep in mind when you are trying to create a naturalistic blending of two or more colors.
In the example above the main color was digitized using a .40 mm or 4 embroidery points space between stitches, on the overlapping colors we increased the space to
.90 mm which decreased the density by more than half. This creates a smoother transition and keeps the combination of densities from getting too dense.
You also want to make sure that you keep all of your stitches as parallel as possible so that the colors will blend together and not appear to be separate shapes or objects.
Blending colors together to increase the three dimensionality of your designs is easy if you just stick to these two factors; density and direction.

Wednesday, November 18, 2009

Create Your Own Custom Font


In addition to creating your own fill patterns and motifs KPD compositions also allows you to create your own custom fonts. you can use an existing true Type font or create your own font from scratch. All you need to do is to save all of your letters (named to correspond to their Character Map name as 1=0031)in a folder called whatever you wish the font to be called. Save them as .lbf format files, then place the folder on your c drive in programs/KPD/fonts/characters.
You can then press shift+ctrl=F and generate the font. Now you are able to use it just as you would any other font in your program.
This is a great way to increase you available font selection at your leisure and all it costs is a little of your time.

Wednesday, November 11, 2009

Fun with Fills


As with the other two stitch types, runs and satins, fill stitches may be manipulated very easily to create exciting new textures and effects.
Standard Fill
When you choose fill stitch you will automatically be in standard fill mode, this is the most popular fill style used. It consists of a pattern of parallel running stitches that are alternated in a predetermined pattern based upon the offset of each row of stitches to the preceding row. It is calculated in a similar fashion to laying rows of bricks. This stitch type allows you to change the density and stitch length to vary the look of the fill
Emboss Fill
The emboss fill derives it's pattern from a shape that is essentially embossed into the fill. Wherever the running stitches in the fill intersect with the image transposed onto it the needle will come down and make a stitch, so this fill pattern consists of many different stitch lengths based upon where the image and running stitches meet.
Motif Fill
The motif fill replaces the running stitches in the fill with a digitized design, which can consist of running or satin stitches. This is a great way to add a lacy effect to your designs and at the same time reduce your stitch count.
Please be aware that you can create your own patterns for both the emboss and motif fills so that you can customize them with the texture or even logo you are digitizing.
Fill stitches, of course, are used predominantly to fill large area of stitching in your designs, so why not take advantage of this large portion of your designs, by experimenting with all of the textures and effects that can be achieved by manipulating your fill properties.

Wednesday, November 4, 2009

Satin Stitch Options


Satin stitches are, in my mind, the most versatile of stitch types at an embroidery designer's disposal. They can be one throw across, patterned, or be converted to a contour stitch. The nicest feature of this stitch type is that you can control and manipulate the stitch directions throughout the shape to add more life and movement.
The most impact is achieved with a true single throw satin stitch, as this will reflect the most amount of light and truly stand out against the rest of the stitch types in a designs. Sometimes however the area you need to cover is wider than a single throw will practically reach, so you really have to divide up the stitches, and you have many choices as to how you do that.
Standard pattern
The simplest way to divide up the stitches in your satin column is to apply a pattern, this can include something as simple as a random fill to the more defines corn row pattern. You can also make the stitching in each one of the patterns longer to impart more sheen or shorter to make the pattern more pronounced.
Embossed pattern
If you choose an embossed pattern you can give it a more defined texture, you can even choose your own motif to carve out of the pattern.
Contour
Opting for a contour fill can totally change the entire personality of the stitch. You can transform a silky satin stitch to a very patterned and snaky combination of undulating running stitches.
Whatever you choose be aware that you can apply just about any personality to a simple satin stitch, with the switch of a few property options.

Wednesday, October 14, 2009

Digitizing Tidbits and Random Thoughts


We all know that you can choose to digitize a design either automatically, semi-automatically or choose to tackle the design manually, but did you know that there are a lot more decisions, some obvious and some a little more subtle. I figured that I would jot some down, and share them with you.
Here they are in no particular order.

Minimizing the details
You can only put so much detail in a design before it becomes indistinguishable.
Also including too many details will also cause thread breaks and bird nesting, because there is a limit as to how many stitches can be placed in any given area.
To pare down details try tracing the details on tracing paper with a pencil. The width of an unsharpened pencil will roughly equal the width of a bean stitch.
In the very least turn 3-D view on and view it at 1:1 ratio before you sew it out, if the detail looks good you are fairly safe that the design will also. Another thing to look for is short stitches, they are also a source of thread breaks.

Overcoming fabric types,textures and patterns
Use underlay to stabilize the design, always start with an overall running stitch underlay on stretch or slippery fabrics.

To use underlay to flatten the texture of knits such as pique, place a zig zag underlay under satins and a lattice underlay under fills.
Also use lattice underlay under fills when sewing on velvet, corduroy, and fleece.
Use edge walk running stitches under columns when sewing on twill
When sewing on caps, start in the middle and work our way out alternately from side to side. Place your underlay as you digitize each piece.
Overlapping
Always overlap the first color and then place the second color on the dividing line. If you rely on pull compensation to make your stitches overlap you lose control of the exact point where they meet.
Blending
You can either choose to blend colors by using a gradient density or by overlapping fills or satin stitches.
When using either of these methods you want to keep the stitches as close to parallel as possible, so they will blend and not separate.
Lettering for foam
By placing satin stitch at the end of each column, you can be assured that the ends of the column stitches will be perforated and the edges will be hidden.
The few random thoughts were meant to get you to think about why some embroidery problems occur and to help cut them off at the pass.

Wednesday, October 7, 2009

Auto-digitizing Embroidery


You can use autodigitizing either alone or in conjunction with your editing fuctions to create great embroidered designs with no additional effort, if you start with the appropriate artwork.
If you are using bitmap artwork it should ideally be 300 dpi and should be either the smae size or larger than your embroidered design. If you are using vector artwork, the results are even better.
Another advantage you gain when using KPD Compositions is that you can edit your artwork within the autodigitizing wizard, which saves you time and allows you to try out many different variations before finalizing you choice and outputting your design.
Autodigitizing is often dismissed as unprofessional and for beginners only, but there are many situations where autodigitizing is definately the ovoius choice for speed, accuracy and quality.

Thursday, September 17, 2009


We all know that we use underlay to attach the base fabric to the backing so that the garment will not move within the hoop during the embroidery process, but did you know that there are a lot more reasons, some obvious and some a little more subtle.
They are:
To overcome fabric textures and patterns
To flatten the fabrics surface
To compensate for a loose top density
To create a 3-D effect

Standard underlay
Used to attach base fabric to backing
.1 to .25 in. column stitches use center run stitch
.25 and up add parallel satin
For fill stitches use lattice underlay

To compensate for patterned fabric surfaces
Edge walk adds structure to satins on fabrics with a surface texture such as twill, pique and birds eye knits, this will serve as a base for the top stitching and keep the stitches from following the grain of the fabric and causing a stepped look.

To flatten the nap of a fabric
Terry, corduroy, velvet and any other fabric with a nap require a cross satin underlay to flatten out fibers before you embroider your design to avoid fibers showing through the stitching
A water or heat soluble topping also helps avoid this problem.

To compensate for a loose density
Leather, sheer fabrics, lame and other delicate fabric can not support a normal density without tearing.

To create a 3-D look
To get coverage without raising your density place an inset satin underlay.
Multiple layers of satin stitch underlays can be used to give your embroidery a more 3-dimensional look
Start with a narrow satin and make each subsequent layer a little wider, usually three layers is sufficient.

You are only going to reap the full benefit of underlay if you first understand why we use underlay and which type is appropriate fr your particular situation.

Monday, September 14, 2009

Lettering


We all have our favorite settings for creating lettering for different situations. For small lettering I like to decrease the density to 45 SPI and to add a single perpendicular running stitch as the underlay. For large lettering on a towel I like to use density of 65 SPI and a crosshatch underlay. You get the idea, and I am sure that you all have your own list of perfect combinations of settings that work just right for you. When you are creating your lettering using KPD Compositions you can save an unlimited amount of lettering styles, so that you can quickly and automatically call up the most perfect and personalized settings for the particular type of lettering you need.
Digitizing Lettering
When you run into a situation where the perfect font is not available it is necessary to digitize the lettering yourself. In this case the artwork you are working from is extremely important. If you are using the auto digitizing or semi-automatic function of your software to perform this function make sure that your artwork is 300 dpi or higher and the artwork is at least the same size of your finished embroidery or larger. The best method to use however is manual digitizing. The reason for this is when digitizing lettering the way in which your column stitches are divided up or branched is crucial for the best translation of the artwork into embroidery. When you are looking at an embroidery of something organic, such as a flower or a leaf variations from the original artwork are usually hard to discern, variations in lettering are almost always easy to spot. Everyone knows what lettering is supposed to look like and any variation from the norm is very obvious.
Size
The size of the lettering that you choose will also determine how you digitize the individual letters. You probably have noticed that just about every software manufacturer offer at least one small script and block font. The reason for this is that when you are sewing out lettering at .25 inches or smaller the rules that apply for embroidering larger lettering don't necessarily apply. Digitizing the corners of the lettering by inputting the individual stitches is the preferred method.
Fabric
When you decide to embroider the same lettering design on different fabrics you need to make sure that you create it for the most challenging fabric. for example if you are digitizing for denim and pique, digitize your lettering for the pique. You will end up with a higher stitch count but you will be assured that it will embroider well on both.
Pull compensation
If you are if you are digitizing lettering to sew out on fleece and twill, I would suggest that you digitize the design for twill and to automatically increase the pull compensation for the fleece application.
Underlay
As in the case of pull compensation I would digitize the lettering with a single center run stitch underlay and then as I increased it in size add first an edge run and then at over .75 inches also add a zig-zag underlay.
Visually correct adjustments
Distorting keyboard lettering
If you look at the example of a standard computer font "EGGSALAD" you will notice that the rounded letters "G" and "S" are slightly larger than the others so that they will appear o b the same size when the word is viewed as a whole. The example of the same word in small embroidered lettering takes the rule a little further, not only is the "G" and "S" larger but so are the letters that have horizontal column stitches such as the "D" and the "E"
Many logos utilize a standard font with only minor changes to either the first letter or letters within the wording. Before you decide to digitize the lettering portion of the design see if you can use the lettering portion of your software to create the lettering and then select the individual letters that need to be altered and adjust them one at a time.
Lettering is just like every other portion of your design, you need to follow all of the same rules as you would when digitizing any design. If you start with good artwork, whether you decide to use keyboard lettering or digitize the lettering from scratch while taking fabric, and sizing limitations in mind your results will be successful.

Wednesday, September 9, 2009

Embroidery digitizing Part 1


We often talk about embroidery software and which icons do what, but in the end, it’s not all about the software, it’s your abilities that make the real difference!
If you have a real understanding of the basics of embroidery you can really make any software program do what you need. It's what you feel most comfortable using that should determine your final choice.
Let's take a look at what those basics are.

Density
It is very easy to take density for granted. When you power up your software, it will automatically choose a density for you. It could be the default density or a density based upon the fabric that you chose at start up of your new design. This is a reat point of departure but there are so many more things you can accomplish with various different densities.
If you are trying to blend two or more colors together you have to take density into consideration, because when you layer colors over colors the density will quickly build up and the reult will be a thick embroidery which will crinkle on the edges and be very uncomfortable to wear.
If you know what color fabric you are going to embroider upon you can reduce the densities of those areas of your design that are the same color as the base fabric.
If th column widths within your design vary dramatically you would need to increase the densities for the wide columns and reduce the densities of the narrow ones.
Overlapping and Pull Compensation
Using the automatic pull compensation settings of your software can solve many of your overlapping problems, however there are situations in which you will find that you need to make some changes manually. Two of the examples are illustrated above, in both the beachball and the star designs. In the example of the star the last small stitches that would have created the points of the star have been removed and replace with a single running stitch place in a perpendicular position to the satin stitches. If the satin stitches were brought to the end they would have been so small that they either would have caused thread breaks or created a hole in the fabric.
In the case of the beachball, if all of the stripes had met at the top of the ball it would have caused a hole or at the least thread breaks in the last couple of stripes. I exaggerated th overlap to keep the blue stripes from placing needl penetrations in the same place and I kept the yellow stripes from meeting at the top so that they would not cause a hole.

Friday, August 28, 2009

Design Pathing


One aspect of digitizing that is often ignored, especially by beginning digitizers is pathing. Pathing is the mapping out of the stitching order of the various different objects that make up your final digitized design. There are many different reasons for planning out the sewing order in advance, which include the amount of jumps and trims, the overall sewing time, and potential machine risks which can result from a poorly planned design.
Minimising color changes
Every color change that you place in your designs adds time to the overall sewing time of the design. To change from one color to another the machine must first stop and trim and then the head has to slide to the next desired color and then when the machine begins sewing again it first starts slowly to avoid the thread from pulling out of the needle and then it resumes sewing at full speed. So for every extra color change you place in your design you are adding approximately 7 seconds to the overall sewing time, or if you place 10 extra color changes you are adding 70 seconds, and if you run that design 10 times on a six head machine you are adding 60 X 70 seconds or 70 minutes. So you may not think an extra color change here or the matters too much but at the end of a day of production it can have a huge effect.
Trims and jumps
Both trims and jumps also cause the machine to stop and slow down, often times especially if you are relying on auto digitizing to create your designs the frequency these two commands id overlooked, but if you take the time to look at the sewing sequence of your design either before on your computer or while it is sewing out you can easily devise a plan for either reducing their occurrence or eliminating them all together.
Sewing time
Keeping an eye on all of these factors can greatly increase the efficiency of all of your designs.
Production Issues
The last issue that I would like to address is that of wear and tear on your embroidery machine. Trimmers, color change mechanics and jump stitch solenoids are all mechanical parts which with repeated and frequent use can become overheated and as a result fail well before their expected lifespan. If you trim twice with less than 40 stitches between the trims you are not giving the machine a chance to cool down between operations, if you do this constantly you will most definitely damage the machine. so it is important to plan out your design before you begin to digitize. A good example of this is a Field of polka dots with a fill background. If you digitize the fill first and jump and trim from polka dot to polka dote you stand the risk of damaging you trimmers, but if you digitize the polka dots first and place a fill with voids on top of it you can omit the trims entirely.
If you plan out you designs before you digitize them you can save both running time and excess wear and tear on your equipment. Your run time will be quicker and your machine will last longer.

Thursday, August 20, 2009

Building your customer Base


A major concern for all business owners is getting and keeping new customers, in our current economic climate it has become pretty much essential.
Website
Just about every business has a website, if you don't you should, but creating and hosting a website are just the first step. You then need to drive traffic to it. Make sure that your website is mentioned in everything that you do. Invoices, business cards, stationary, advertising, press releases and listings all need to include your web address.
Blog
Hosting a blog gives your current and prospective customers a place to go to see what your company is doing and any specials you are offering. Make sure that you include helpful and informative information that is going to be beneficial to your customers, so that they have a reason for returning on a regular basis. if you don't add new material on a daily basis then make sure it is added at the same time every week or month so they get into the habit of checking it at those intervals.
Newsletter
A great way to remind you customers to visit both your website and blog is a weekly newsletter, this will assure that your customers get weekly reminders to either visit your shop, website or to even call you to follow up on specials or new products.
Cold Calling
The most time intensive forms of customer connection is cold calling, but it offers the biggest return for the time invested and it opens up a two way dialog with your customers, which is a great way to make sure you have a good feel for your customers needs.
Specials, new Products and Incentives
While we have all cut our costs and our prices to the bare bones, making sales and discounts close to impossible in many cases, there is always some inventory that we need to move regardless of the price, even if we just break even. Use that product to get customers to contact you, and while you have their attention bring up your new products and embellishment techniques.
Networking
Don't forget to bring your business cards wherever you go, remember everyone needs embroidery or some kind of embellishment at one time or another, use your card to remind them to contact you when they do.
Getting Involved
Get involved with your community schools, businesses, fund raisers, library, fairs and any other social events, these are the places, events, and organizations that use and need personalization.

Friday, August 14, 2009

File Formats


KPD Compositions allows to to output your designs in over 32 different file formats, which include both home embroidery and commercial embroidery file types. With all of these formats to choose from there is virtually no customer for which you are unable to produce designs. When shopping for software make sure that you start by listing all of your needs and as you view the many choices out there check off all of the feature on your list one by one.

Monday, August 10, 2009

Fabric Facts


To understand the impact embroidery is going to have on the products upon which you are placing it, you first need to understand how the various different fabrics affect the designs you are embroidering on them.
Woven Versus Knit
Knits stretch and because of that they require a stable backing and enough underlay to connect the fabric to that backing so that the knit can't move during the embroidery process and in doing so, cause the design to become distorted. Woven fabrics are a lot more forgiving, they only stretch on the bias, so if they are firmly hooped and have a minimum of underlay and a sufficent backing, you should not have to worry about design distortion.
Needles
The size of your needle should relate to the weight of your fabric, a heavy weight fabric such as canvas or denim requires a larger needle. for fine fabrics you want to use a small needle for example, a 65/9 or a 70/10 as a smaller needle will make a smaller hole and do less damage to the fabric.
The point of the needle is chosen by the fabric, ballpoint for knits and sharp for woven fabrics. Ballpoint needles will push the fibers of the knit aside so that they aren't broken in the embroidery process which would cause the knit to run. Sharp needles are best for woven fabrics because they cause the least amount of friction as they pierce the fabric and make the cleanest perferation, helping to keep your lines crisp.
If you are embroidering on a fabric with a texture, whether it is knit or woven underlay is essential for flattening out the fabric so that the embroidery is not lost in the indentations or overemphasized in the raised areas. Fabric with a definite pattern such as twill or pique require a running stich underlay along the edge of the columns to keep them from following the grain of the fabric.
Each fabric has different needs once you understand how to inherent differences of
the array of goods you embroidery you will understand how to overcome them.

Friday, July 31, 2009

Applique Basics


The introduction of appliques to your digitizing projects can reap both creative and practical rewards. The use of appliques can allow you to reduce the stitch count of your designs by as much as 80%. This will, of course, reduce the sewing time by almost as much, once you factor in the extra time necessary to place and tack down the applique or appliques.
Another benefit of using appliques, especially in large designs, is that it can be used to replace large areas of fill stitches, which can tend to make the design area stiff and uncomfortable to wear.
Digitizing
If your software has an automatic applique function (as in KPD Compositions Pro), the following steps will be added for you. First a placement line (running stitch)is digitized and followed by a stop code or color change. This will stop the design so that you can lay down the applique. Next a tack down stitch (either a zig zag or running stitch) is digitized so that the applique will be secured to the base fabric and then the applique is finished off with either a zig zag or satin stitch.
Techniques
There are a few different ways to cut out the appliques, and the choice of technique is based upon the amount of designs in the job order and the frequency that you use appliques in your designs.
Hand-cut
Hand cutting your designs is the most labor intensive and is a practical alternative only for very small jobs or samples or in an emergency when there is no time to send out the fabric to be cut. There are two methods commonly used, template and cutting on the machine. To create a template for your applique, hoop a light cardboard on you machine and sew out the applique placement line on the cardboard. You can then cut along the perforations and use this template to trace out and cut your appliques. You may also choose to cut the appliques in the hoop. To do this, digitize your tack down stitch inside the middle of the finishing satin stitch. Place a square of appliques fabric large enough to cover the entire appliqued area, and stitch it down. The remove the hoop from the machine and use a pair of applique scissors, cut along the outside edge of the applique, then place the hoop back on the machine and resume sewing.
CAD Cut
If you do a lot of applique work you might want to invest in a CAD cutter to use to cut them in-house. You can export a cut file from your software to run the machine and to assure that the applique is going to fit in your design perfectly.
Laser or water-jet cut
If you use appliques infrequently it would probably be best to send your digitized file to an applique cutting facility, the turn around time for this service can be as quick as 24-48 hours.
If your applique are large enough you might want to invest in a laser cutter or a beam laser. The advantage of a beam laser is that it allows you to cut either single or multiple appliques on the embroidery machine, which expedites the entire process.

Friday, July 24, 2009

Why Does Thread Break?

Thread breaks for a number of very different reasons. Some are logical and obvious, such as threading route, thread quality, and tension, but there are other contibuting factors that can also cause embroidery thread to break.
Thread
While there are many different thread weights and types that can be used to create embroidery, most embroiderers choose either 40 weight rayon or polyester. Because polyester is a synthetic product it has a much longer shelf life than rayon, which is produced from natural celulose fibers. If you are using rayon threads try to store it in climate controlled environment, and try to use the thread that has been in your inventory the longest first.
Tension
Proper thread tension is achieved by creating a balance between the top thread and the bobbin thread. If you place too much tension on the top thread even if it in proportion to the bobbin thread it will break.
Threading
The first thing you might want to check when you are experiencing any type of stitching quality problem is the threading route, this is simple to fix and often the simplest solution is the last to be checked.
Presser Foot
A bent presser foot can hit the needle and damage the needle and break the thread.
Needle Plate
A gouge or burr in the area of the hole in your needle plate can also cause the thread to fray and break.
Needle
Needles do not last forever and if you expeience any type of needle depth, presser foot or needle plate problem change the needle also at the same time to assure that it isn't contributing to the problem.
Of course there are many other possible causes for threaad breaks but these are the most common ones that I have found and are a good point of departure when trying to sove the often fustrating problem of consistant thread breaks.

Thursday, July 23, 2009

embroidering on knits

Every type of fabric has its own unique charactoristics, and its own challenges. Knits are no exception, needle type, backing, hooping, thread tension and proper digitizing all need to work together to produce the perfect end result.
Needle
To avoid cutting the fibers of the knit use a ball-point needle, a 75/11 should work well for any weight knit.
Backing
Tear-away backing is always the prefered choice as it is the least labor intensive to remove. however some knits are too delicate and can tear during the embroidery process so you need to turn to a no-show or organza backing which will afford more support without adding more bulk to the garment.
ToppingIf you are embroidering on a knit with a patterned texture such as pique, herringbone, birds-eye or cableknit you probably want to use a topping to flatten out the surface before you embroidery upon it.
Hooping
you do not want to stretch to knit in the hoop (with the exception of Spandex, which should be slightly stretched) you want to maake sure that your backing is tight in the hoop and the knit lies flat on top of it.
Tension
Because knits are less stable than woven fabrics they will cause satin stitches to pull in more and become thinner, especially if your thread tension is too tight. It is important to set your top tension looser than you would for a woven fabric and make sure that you bobbin tension is also loosened to make sure they are working together.
Digitizing
When digitizing for knits underlay and increased pull compensation are very important concerns. Use a lattice underlay under fills to minimise distortion and perpendicular underlay under satins to create a good base for the top stitching.
Embroidering on knits is no more difficult than anything else. If you understand why problems may occur they are much more easily remedied.

Thursday, July 16, 2009

Blending Thread Colors


I separated the design above by color to illustrate how you can easily you can create not only the illusion of volume but also the subtle variation from one color to another.
Keep Stitch Directions Consistant
If you are trying to blend different colors together make sure that the stitch directions are parallel this will create a smooth transition from one color to another.
Decrease The Density of Overlapping Colors
Take into consideration the overall density, if you have a density of 60 stitches per inch in each of two overlapping fills or columns, the final density is the total of both or 120 Sttiches per inch, which will create a very dense and hard feeling finished embroidery. however if you reduce the individual densities to 35 stitches per inch you will end up with only 70 stitches per inch and a much more pleasing outcome.
Use a Jagged Edge to overlap Different Colors
Colors blend better if the eges that overlap are irregular. two straight edges will create a more obvious line where they meet than two jagged ones.
Vary Stitch Direction To Define Different Planes
When I tried to differenciate between the outside of the plums and the cut edge of the center, I changed the direction of the stitches and created the two separate planes of the object. The more that you want to differenciate these shapes the more of an angle you want to place the two diffent directions of stitching.
Blending different colors smoothly is easy and can add a lot of depth to your finished embroidery if you just keep these simple steps in mind.

Monday, July 6, 2009

Perfect Placement


Before you start sewing out you first garment it is usally a good idea to check the size and placement as it relates to the garment you are embroidering on.
KPD Compositions allows you to choose from 20 different garment and home decor items all in a wide range of sizes so that you can "virtually" check your placement before you start hooping them.

Monday, June 29, 2009

Auto-digitizing


Automatic digitizing often gets a bad rep, partly because most people that have been digitizing for years know that it can't be all things to all people, and this is true. It can however allow the novice to start digitizing perfectly acceptable designs, while they are learning the more advanced nuances of manually digitizing.
The key to digitizing automatically is to start out with good artwork. If you need to make changes to that artwork you can do this within the auto-digitizing process, before you translate the design into embroidery, or after the design has been converted to embroidery using the shape editor. You can also make adjustments to the automatic density, pull compensation and underlay settings.
Automatic digitizing is a very powerfull tool and one that I encourage you to use, but I also suggest that you preview the resulting design and makev sure there are no adjustments to be made before you sew out your final embroidery.

Thursday, June 18, 2009


Before you start digitizing a design, whether it is automatically, semi-automatically or manually, you can go to the general options menu item in, KPD Compositions, which is located under the tools heading and choose the fabric type that you will be digitizing for. This will set up the proper density, pull comensation and underlay type or types that are most appropriate for this particular design. While this is a time saving device for experienced digitizers, it is a godsend for novices as it pretty much elliminattes the need to understand the relationship between the digitized design and the quality of the finished embroidery. The more you digitize the more you will learn about what settings work for a particular fabric and which don't and you can become more and more involved with the digitizing settings and eventually defining your own unique digitizing style.

Wednesday, June 17, 2009


I created the design above by combining 4 different flowers from my "Fabulous Florals" collection with the lettering "WILD" at the top using Fairbanks block and "Flowers" on the bottom using Bellagio script, using Compositions project based embroidery design software. To see how easy this software is to use go to the demo at www.kenparsonsdesigns.com, while you are there you can also view all of the designs in my many collections.

To view a quick demo go to http://www.youtube.com/watch?v=fisoYgZkypY
Ken Parsons Designs Announces KPD Compositions Advanced and Pro Two new products have been added the the KPD line; KPD Compositions Advanced and KPD Compositions Pro, both are fully functioned digitizing, editing and lettering software programs. Among their shared features are: A totally customizable user interface, which will automaticall choose the proper density, pull compensation, and underlay based upon the users fabric choice. The Autodigitizing Wizard, which totally automates the digitizing process while still allowing the user to edit the artwork and finished embroidery design. Templates, both systems come with both a neckline and circle template, which allow the user to place any design on a neckline, collar, cuff or equidistantly placed on a circle. Lettering which allows the user to create lettering on a line, arc, or morph into any shape using the Envelope feature. Create designs directly on the garment, The garment icon allows the user to bring in an actual garment pattern and choose the location or multiple locations for the finished embroidery and actually create the embroidery within that environment. STO, the built-in stitch processor works in the background so that all changes the user makes to a stitch file will not affect its sewing quality. Simple, clean and self-explanatory user interface, which keeps training and the learning curve to a minimum. KPD Compositions Pro adds: A Repeat Template for sewing patches and name tags. 100 Standard Fonts. True type lettering The ability to convert Vector art to embroidery. Advanced stitch editing and more outline editing tools. Automatic applique, Automatic fills with voids, Steil stitch, and Cross stitch fill. Motifs Artwork Tools And much much more. Right Product, Right Price Both KPD Compositions Advanced and Pro are designed to allow both the novice and professional experienced digitizer to create even the most intricate designs with ease and speed. The programs are completely customizable so that you can choose to digitize using Bezier, simple draw and freehand drawing tools. You can also choose if you wish the program to decide where each segment starts and ends and the direction of the stitching, or you can make those choices manually. For beginners KPD Compositions can be used to totally automate the digitizing process, essentially eliminating the learning curve. For the advanced the built in styles, customization of tools and hotkeys, and a built-in Stitch Processor speed up the process and provide a very comfortable and familiar user interface. About Ken Parsons Designs Ken Parsons Designs was established in 2006, and has always been a software and embroidery stock design provider. Our dealers include; Ann the Gran, Embroidery Central, Embroiderydesigns.com, and Metro embroidery threads. Pricing KPD Compositions Advanced List Price: $499. KPD Compositions Pro List Price: $1,199.

We all have our favorite settings for creating lettering for differnet situations. For small lettering I like to decrease the density to 45 SPI and to add a single perpendicular running stitch as the underlay. For large lettering on a towel I like to use density of 65 SPI and a crosshatch underlay. You get the idea, and I am sure that you all have your own list of perfect combinations of settings that work just right for you. When you are creating your lettering using KPD Compositions you can save an unlimited amount of lettering styles, so that you can quickly and automatically call up the most perfect and personalized settings for the particular type of lettering you need.

Thursday, May 21, 2009

What people are saying!


"I have been digitizing for over 25 years and when I tried Compositions Pro I was blown away, after watching the training video I was able to start digitizing in about five minutes. It is truely remarkable," Lisa Muller
"I have always wanted to learn to digitize and getting the Compositions Pro was just the right ticket for me! My biggest concern, after money, was that it would take me weeks to learn and months before I could do something that I was proud of. It is modestly priced and easy to follow and I did my first simple project within an hour. I am progressing quickly and having fun with it now." Pat, The Avid Embroiderer
"So far from what I have seen, it looks pretty easy to use. ... If you have an understanding of other software like Illustrator, Corel Draw or even Flexisign, it should be relatively easy to pick up. I do have to say that it seems to logically be laid out with tools that make sense. I can't wait to use it more! Thanks for answering my questions."

Edgar Flor
Amazon Design Graphics, Inc.

KPD Compositions now offers Cheille and Sequin digitizing


Ken Parsons Designs is now offering an upgrade to sequins and chenille for it top of the line digitizing program KPD Compositions Pro. For just $300. more you can add the capability to digitize for either sequins or chenille. These features give the digitizer the ability to tackle any embroidery job that is out there.
Fully functioned, easy to use, and totally user customizable, that is what KPD Compostions is all about. This is the software program every digitizer has been waiting for.

Thursday, May 7, 2009


Ken Parsons Designs Announces KPD Compositions Advanced and Pro Two new products have been added the the KPD line; KPD Compositions Advanced and KPD Compositions Pro, both are fully functioned digitizing, editing and lettering software programs. Among their shared features are: A totally customizable user interface, which will automaticall choose the proper density, pull compensation, and underlay based upon the users fabric choice. The Autodigitizing Wizard, which totally automates the digitizing process while still allowing the user to edit the artwork and finished embroidery design. Templates, both systems come with both a neckline and circle template, which allow the user to place any design on a neckline, collar, cuff or equidistantly placed on a circle. Lettering which allows the user to create lettering on a line, arc, or morph into any shape using the Envelope feature. Create designs directly on the garment, The garment icon allows the user to bring in an actual garment pattern and choose the location or multiple locations for the finished embroidery and actually create the embroidery within that environment. STO, the built-in stitch processor works in the background so that all changes the user makes to a stitch file will not affect its sewing quality. Simple, clean and self-explanatory user interface, which keeps training and the learning curve to a minimum. KPD Compositions Pro adds: A Repeat Template for sewing patches and name tags. 100 Standard Fonts. True type lettering The ability to convert Vector art to embroidery. Advanced stitch editing and more outline editing tools. Automatic applique, Automatic fills with voids, Steil stitch, and Cross stitch fill. Motifs Artwork Tools And much much more. Right Product, Right Price Both KPD Compositions Advanced and Pro are designed to allow both the novice and professional experienced digitizer to create even the most intricate designs with ease and speed. The programs are completely customizable so that you can choose to digitize using Bezier, simple draw and freehand drawing tools. You can also choose if you wish the program to decide where each segment starts and ends and the direction of the stitching, or you can make those choices manually. For beginners KPD Compositions can be used to totally automate the digitizing process, essentially eliminating the learning curve. For the advanced the built in styles, customization of tools and hotkeys, and a built-in Stitch Processor speed up the process and provide a very comfortable and familiar user interface. About Ken Parsons Designs Ken Parsons Designs was established in 2006, and has always been a software and embroidery stock design provider. Our dealers include; Ann the Gran, Embroidery Central, Embroiderydesigns.com, and Metro embroidery threads. Pricing KPD Compositions Advanced List Price: $499. KPD Compositions Pro List Price: $1,199.

Wednesday, April 29, 2009

Are you afraid of digitizing?


10 Reasons to upgrade to Compositions Advanced and Pro

1. User friendly interface
Digitizing has never been faster or easier!
2. Short learning curve
Start digitizing on the first day!
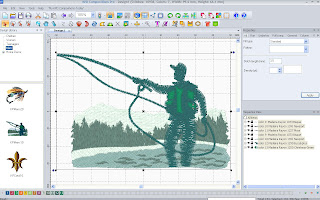
3. Excellent stitch quality
Both novices and experts will be amazed by the stitch quality!
4. Advanced lettering capabilities
The advanced envelope feature allows you to fit lettering into any shape!
5. Connect directly to your Tajima, Barudan, SWF, KSM, Ricoma, or Toyota machine
Send your finished designs directly to the machine and eliminate an entire step!
6. Import both raster and vector artwork files
Virtually any type of artwork can instantly be transformed into embroidery!
7. Auto Digitizer Wizard
Take the hassle out of digitizing, let the program do it for you!
8. Magic Wand Semi-auto-digitizing tool
Keep control of the digitizing process while eliminating the grunt work!
9. Templates
Place designs on a circle, neckline or in a pattern automatically!
10. Advanced outline and stitch editing
Make changes to your design at any step in the process always maintaining quality control!

Embroidery just got a whole lot easier, and you can test drive it today just go to www.vectorsoft.gr/download/kp/KPDCompositionsSetup207.exe to download a read only copy.
KPD Compositions Advanced and KPD Compositions Pro, both are fully functioned digitizing, editing and lettering software programs.
Among their shared features are:
A totally customizable user interface, which will automatically choose the proper density, pull compensation, and underlay based upon the users fabric choice.
The Autodigitizing Wizard, which totally automates the digitizing process while still allowing the user to edit the artwork and finished embroidery design.
Templates, both systems come with both a neckline and circle template, which allow the user to place any design on a neckline, collar, cuff or equidistantly placed on a circle.
Lettering which allows the user to create lettering on a line, arc, or morph into any shape using the Envelope feature.
Create designs directly on the garment, The garment icon allows the user to bring in an actual garment pattern and choose the location or multiple locations for the finshed embroidery and actually create the embroidery within that environment.
STO, the built-in stitch processor works in the background so that all changes the user makes to a stitch file will not affect its sewing quality.
Simple, clean and self-explanatory user interface, which keeps training and the learning curve to a minimum.
KPD Compositions Pro adds:
A Repeat Template for sewing patches and name tags.
100 Standard Fonts.
True type lettering
The ability to convert Vector art to embroidery.
Advanced stitch editing and more outline editing tools.
Automatic applique, Automatic fills with voids, Steil stitch, and Cross stitch fill.
Motifs
Artwork Tools
And much much more.


Right Product, Right Price

Both KPD Compositions Advanced and Pro are designed to allow both the novice and professional experienced digitizer to create even the most intricate designs with ease and speed. The programs are completely customizable so that you can choose to digitize using Bezier, simple draw and freehand drawing tools. You can also choose if you wish the program to decide where each segment starts and ends and the direction of the stitching, or you can make those choices manually.
For beginners KPD Compositions can be used to totally automate the digitizing process, essentially eliminating the learning curve. For the advanced the built in styles, customization of tools and hotkeys, and a built-in Stitch Processor speed up the process and provide a very comfortable and familiar user interface.


About Ken Parsons Designs
Ken Parsons Designs was established in 2006, and has always been a software and embroidery stock design provider. Our dealers include; Ann the Gran, Embroidery Central, Embroiderydesigns.com, and Metro embroidery threads.

Pricing
KPD Compositions Advanced
List Price: $499.
KPD Compositions Pro
List Price: $1,199.

Wednesday, March 18, 2009

Burn-Out Transfers


Burn-Out Transfers


Burnout transfers create a “shadow-like” effect on the garment and can be printed on any color. They are incredibly soft with almost no hand-feel. These transfers are perfect for creating high-end fashion looks on a multitude of garment styles. Each transfer group comes on a 16 x 20 inch cut-up sheet, and can be arranged on the garment any way you like. A two-tone “color smear” effect is also available. Burnout transfers are also foil-ready, for a quick and easy streetwear look.

One Hit Foil


One Hit Foil


A High-End Look!


Our foil heat transfers add an incredible high-end look to any garment. These custom prints are machine washable and can be ordered at low minimums. No more two hit prints!

Custom Heat Transfer Decoration


Custom Heat Transfer Decoration

For Apparel & Textile Accessories

Art Brands is a world leader in the custom heat transfer industry. We send our custom heat transfer designs to every corner of the globe so that retailers, garment manufactures and businesses of all types can take advantage of the quality of our art as seen in our stock heat transfer designs. We are now bringing our fashion sense, passion for excellence & quality to our heat transfer customers within the construct of our updated large capacity Custom Heat Transfer Division. We now offer the same unique high quality printing processes used to produce our industry leading stock heat transfer designs.


877.755.4278


customs@artbrands.com

Friday, March 13, 2009

Great New Magazine


The magazine is called Hot Graphics and covers the art and science of heat-applied graphics which is revolutionizing the awards, gift and garment-decorating industries.

Find these answers and more in Hot Graphics Annual!
• What is heat-applied graphics?
• Where can I learn more about it?
• How can I add it to my current product mix?
• Will it increase my sales?

Presented by Printwear, A&E and Custom Gift Business magazines, Hot Graphics Annual is an essential asset for your business success. Written by heat-transfer industry experts and specifically targeted to the decorator and retailer, Hot Graphics Annual is a must-have information resource. Designed to answer all your questions about heat transfers, it's a reference tool to be used again and again!

Thursday, March 12, 2009

Laser Engraving and Cutting


All of the pictures and samples above are courtesy of BITO http://www.bitousa.com/LaserSamples1.htm who was kind enough to provide them to me. I tried to show you just some of the wide range of effects that can be achieved with lasers as well as the different size laser cutters that are available. There is pretty much a laser cutter to serve every need and every budget. You can cut through one layer of fabric or multiple layer of fabric to create multi-color appliques in one operation. You can also adjust the laser to just etch the surface of the fabric or of leather. The designs can be as simple as the combination etching and cutting of the flower design, or as complex as the photo-realistic portrait of the woman's face. The intricate cutwork on the woman's boot panel is illustrative of its unlimited design potential in footwear, handbags, and just about any segment of fashion. If you want to be on the forefront of garment decoration, a laser cutter should be at the top of your wish list.

Wednesday, March 11, 2009

Magnetic Badges

Outsourcing Products and services

As a garment decorator or Advertising Specialty Distributor (provider) you can't expect to be able to create everything your customers need. This is where you ability to outsource is extremely crucial. The easy way to get your hands on all of this information in one place is to join one of the organizations that does that as it's main occupation such as ASI, the Advertising Specialty Institute or PPAI The Promotional Product Advartising Institute. However depending upon how often you utilize these services can be quite expensive. The alternative is to do the homework yourself. A good plce to start is by iether subscribing to industry publications such as Impressions, Printwear, and Stitches magazines. You can also go to their websites and also gain not only sourcing contacts but also valuable information on new processes and new technology. The best salesperson is the one who actually understands what he is selling. I attended the ASI show at the Jacob Javits Center in NYC yesterday and in the next few posts I will share wih you some of the vendors and products I saw. If you click on the title of this article it will take you to the exhibitor list at the ISS Imprinted Sportswear show held in Atlantic City on March 13-15, 2009 For a complete listing of shows go to www.issshows.com

Monday, March 9, 2009

Why Consider Chenille?


Texture has always been the major draw to embroidery, but the traditional textural techniques alone can make your logo all too similar to your competitor. This is where Chenille comes in. Chenille is created using two different stitches; chain and moss. The moss stitch consists of loops of yarn, and the chain stitch is a flat stitch primarily used to make the edges of the moss stitch look neater and more consistent. Chenille has always been a specialized sector of the embroidery industry, which makes it more difficult to find a supplier. Corporations, schools, teams, fashion designers, organizations, fraternities, sororities, clubs, individuals, movie studios, Grand Prix and Motorcross, pop and country music stars, and sporting goods team dealers all use chenille embroidery and the demands are greater than the services available, so if you decide to go this route make sure the manufacturer can fit your needs and time frame.

What are some of the garments you might want to decorate?


Aerobics Wear
Aprons
Award Ribbons
Bath Sheets
Blouses
Car Mats
Christmas Stockings
Coat Linings
Dancewear
Dog Collars
Golf Bags
Jackets
Monogram Shirts
Name Tags
Pillow Cases
Robes
Sweat Suits
Towels
Uniforms

Make the Business Grow by Finding New Opportunities


After you have established your business, continue to think about expanding it by finding new customers or offering new services perhaps rhinestones, laser engraving, direct to garment printing, embroidery, Chenille or screen-printing. If you begin as a home-based operation, you may expand to a small kiosk in a mall or a storefront. Each location is different and the customers of each expect different services. Whatever course you select, use every tool available to seek and secure new business. Make sure you are dealing with a distributor who will be there with you for the long run. Make sure that they have the ability to truly help you as you expand your business every step of the way.

Friday, March 6, 2009

Start with the right Equipment


You could start you garment decorating business with something as small as a cap press or a mug press. You don't need to start big, an investment of under $500. could get you business underway if you start with the right customer base and an effective way to reach them such as an email campaign or an e-newsletter or well publicized blog or a combination of all three.

Finding a market for your decorated apparel


You will need to learn about the competition and decide how you can be different. You'll need to find your niche and locate potential customers. You can do this by checking the yellow pages, Chamber of Commerce, finding resources at the library or on the Internet. Once you have found potential customers, you will need to develop a marketing plan to sell your talents. Take into account who and what you know, this is generally a great place to start. Identify groups in your area with common interests either with you or with each other, and choose apparel or accessories that would appeal to them. It could be sports like fishing, or clubs of enthusiasts like car clubs or schools or fund raisers, the list is endless.